Showing posts with label Mommy Crafts. Show all posts

Sunday, February 20, 2011

She Sews Again!

I have been eager for a chance to sew something up for baby girl Zoey and after I saw this super easy tutorial at Fussy Monkey Business I knew I had a project to do. I didn't actually follow the tutorial but I did make my own style burp clothes with some $4 towels from Target.

 I raided my fabric stash and set to work making some adorable one of a kind burp cloths.

 Instead of trying something new and buying materials I didn't have on hand I skipped the bias tape and stitched the cloths together good side facing in, flipped them inside out and finished them with a finishing stitch around the edges to give them a nice clean look.

 Within 30 minutes (not counting the bubble bath or trip to the playground in between!) I had eight handmade burp cloths with 4 different adorable fabrics.

 The fabric side is super cute and the towel side is super absorbent- everything one needs in a burp cloth!

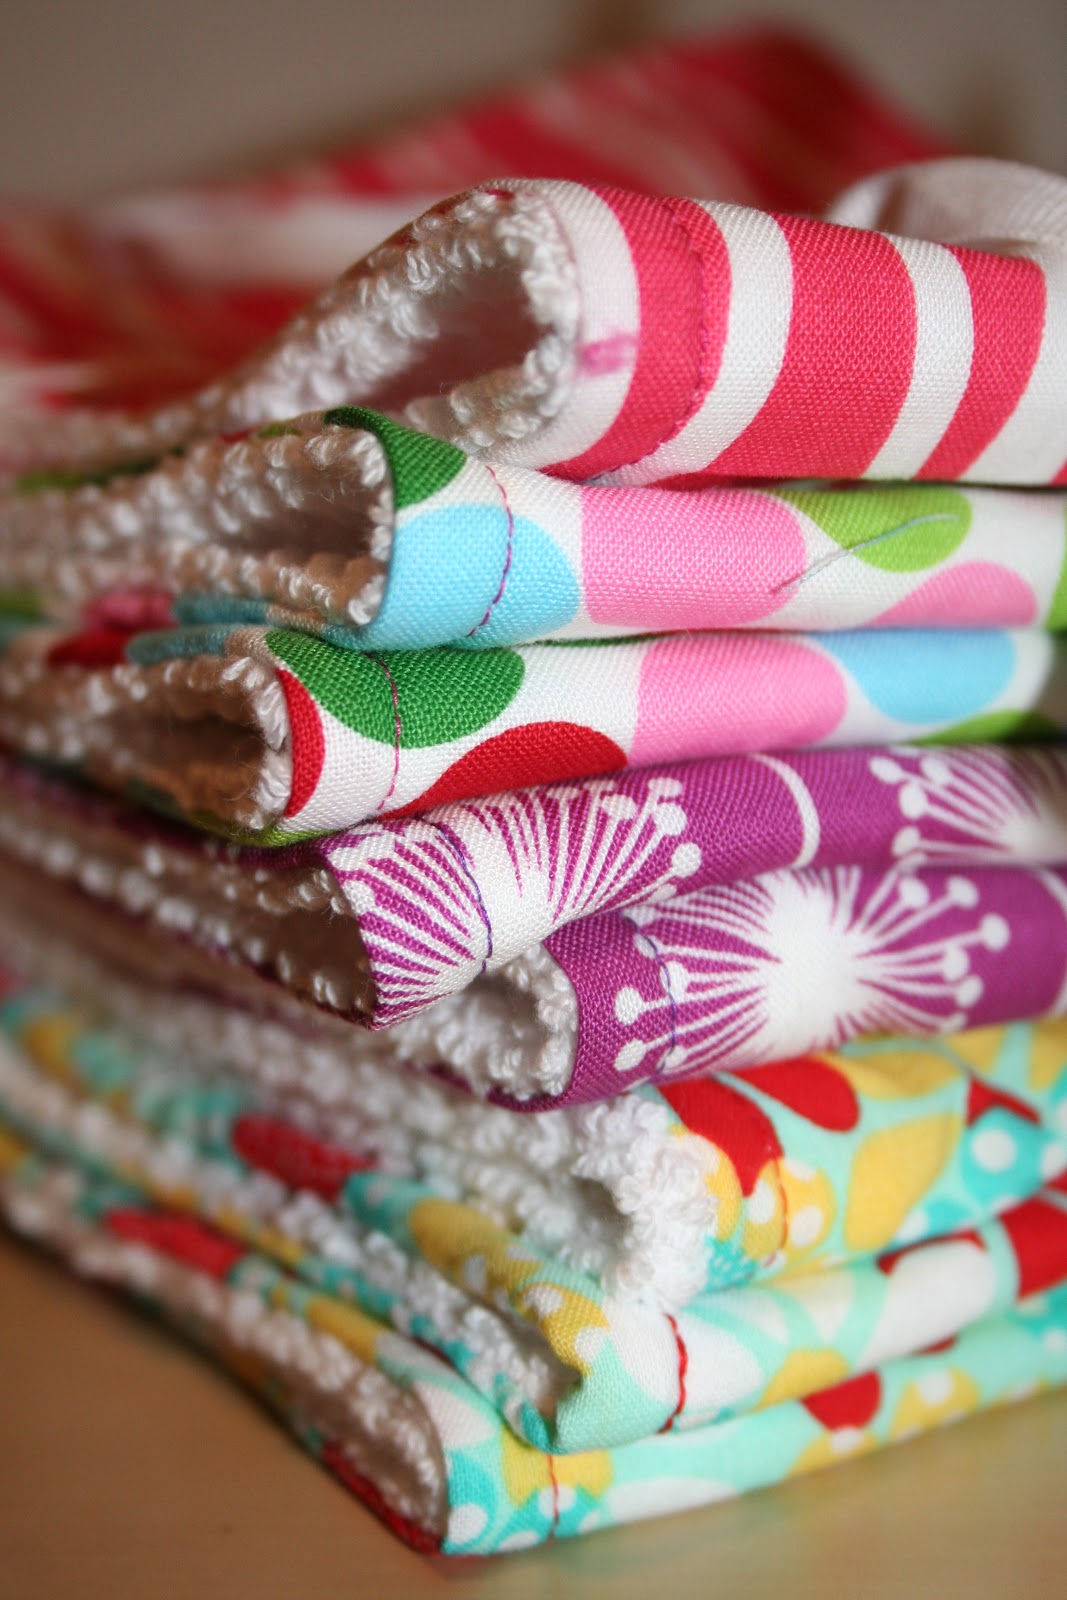
  I have such love for this fluffy stack!

Tied up with a cute ribbon these would make an adorable addition to a baby shower gift too!

Thursday, October 7, 2010

Fabric De-Stash: Headbands

I always do a little happy dance when I think of something great to do with the giant pile of fabric scraps I have! Headbands certainly are nothing new but I did do mine a bit different this time.
After I bought a package of thin headbands I started brainstorming what I wanted to pretty them up with.... I had too much fabric and too many ideas for the amount of headbands I bought. So instead of simply gluing on my embellishments I sewed a little pocket to the back of each one. Now I can mix and match until my hearts content. This way I don't feel so bad when I decide I don't like a certain one either! Or if a little someone accidentally breaks one of the headbands all my hard work isn't for nothing either because we can just switch it to another headband. Genius, I know!

I ended up making a variety of flowers

and ruffles this time around. I am sure I will be making some seasonally appropriate ones soon enough too!

Tuesday, May 18, 2010

Weekly Menu Frame

I can not tell you how unbelievably excited I was when I found THIS FANTASTIC framed menu idea at Under The Table and Dreaming! I may have a few touches of OCD here and there and probably one of biggest is our monthly menu.

It drives me nuts if I ask dear hubby "what do you want for dinner" and I get the customary "I don't know". Thus began the menu. Twice a month I sit down with my latest recipe finds, the list of dinner favorites I keep handy and a blank calendar print out. I write out about two weeks worth of dinners and then write my grocery list right from there. Of course we still have the same conversation but now I am prepared.

Usually I post the menu on the refrigerator which is fine and dandy but now I have this beautiful frame to write it on! Of course I can't hang up until we get to the new house but I still ♥ it so very much!

~~~~~~~~~~~~~~~~~~~~~~~~~~~~~~~~~~~~~~~~~~~~~~

We picked up the frame at Walmart for $5 and I took my handy dandy can of spray paint to it!

I was all for the burlap fabric behind the glass but hubby wanted a fabric that matched our decor better, I can't complain!

I finished up with some cute stickers, on the fabric of course not the glass.


I am so in love!

Wednesday, May 12, 2010

Revamped Artwork


A few weeks ago I mentioned a project in the making, well the time has finally come and it's actually finished! The original idea came from The Craft Monkey ~ an amazing blog with fantastic ideas!


My old kitchen as in the kitchen I still have but have taken everything off the walls of included these lovely prints I picked up super cheap at Home Goods ~ my favorite store of all time. I finally decided it was time for a change though and maybe time to match my kitchen with the rest of my house.

With a can of spray paint and a bit of Mod Podge I was able to create

these lovely prints! I order black and white poster size pictures of Madison from my local Walgreens, trimmed them down to size and pasted them on. I am in love with the finished product and can't wait to hang them in our new house!

Saturday, April 24, 2010

I can't help myself

Yes I am aware that I am in the process of moving and actually taking down all of the decorations in my home. No that is not going to stop me from crafting new decorations.

I am blaming it on all of you anyways.

Every morning I make a cup of coffee and go through my Google Reader and then I say "ohhh" "aahhh" and "pretttyyy" and then I go and make it all!
First let me say I am in love with Craft Monkey! Heidi happens to be redecorating to a beachy theme which has been so inspiring! She posted a beautiful beach plaque she made a few days ago and I thought "hey I have wood and paint I can do that!" and so I did.
I spray painted my piece of wood with two different shades of blue and then sanded it down a bit to get a nice distressed look.

Since I have horrible painting penmanship I printed out the letters for relax in the size and font I wanted, trick here though - I printed the MIRROR IMAGE. This way all I had to do was lay the paper ink side down and trace the letters from the back. The ink transferred the right way onto my wood so that I could paint it. Does that make any sense? I really should have took pictures!

After everything tried I sanded again to finish off the worn beachy look. I love it!
Thhheeeennnnnn I saw these adorable painted mason jars at Gingerbread Snowflakes and set to work! I went with a swirly application for mine and love how they look!


~~~~~~~~~~~~~~~~~~~~~~~~~~~~~~~~~~~~~~~~~~~~~~~~~~~~

EDIT: So I was so in love with my relax sign that I used the same technique and made another sign that says 'goodnight' for our bedroom and took pictures this time!

Step 1: Prep and paint wood. Print the mirror image of the word(s) you want in the correct font and size you need.

Step 2: Place your printed word(s) ink side down on your wood and use a pencil to trace the letters on the back side of the paper.

Step 3: When you peel the paper away the ink will be on the wood leaving you the perfect outline to paint!

Thursday, April 22, 2010

Paper bag wrapping part 2


Since it is still Earth Day I figured I would quickly post my second brown paper bag wrapping project that I did today.

This one is for a 50th anniversary so I went for a little gold bling this time!

I think the gold thread looks fantastic with brown paper.
Who wouldn't love getting a fancy package like this in the mail?

Recycled Packaging

A few weeks ago I stumbled upon an awesome recycled paper bag package idea at A Beautiful Mess and couldn't wait for an opportunity to try it out myself!

My mom's birthday is early next month and her birthday present came in the mail this week ~ the opportunity had arrived!

I love the pink stitching and flowers!

This beautiful wrapping cost all of $0.00! You can't beat that! I didn't need too big of a package so I only ended up using one side of a paper shopping bag and then finished up with some supplies from my craft closet.

Eco friendly and absolutely adorable!

Happy Earth Day!

Saturday, April 17, 2010

Painting the house blue

Not the whole house just yet but I may have a growing problem with spray paint.

I have lurked on tons of blogs and seen some amazing transformations made with a can of spray paint and always thought 'hey I could do that' but never would. Well I finally jumped in feet first and have been spray paint crazy since. There is a bit of a problem though - I only bought two colors! So I am on a bit of a break at the moment trying to decide which color I want to buy next.


And hop on over to The Craft Monkey and check out this AMAZING paint/Mod Podge project that I am working on replicating!

Sunday, March 21, 2010

Handcrafted By My Love

My wonderfully talented husband has done it again! Look at our new coffee table!

I think it looks fantastic with our dark leather couches. I am in love!

Even better the top opens up to fit my Wii Fit Board, our video game controllers (ALLLLL of them), remotes and anything else!

In honor of our new coffee tables I also ordered these adorable coasters by Monika Designs.

My awesome husband also took a little time and spare wood to throw together these wooden frames that I stretched some cute fabric over too!

The plan in our next home (yes stayed tuned for details of our upcoming move) is to have some simple white shelves on the wall that I can stand the frames on. For now I hung the frames on some nails that were already in my walls just to see how they looked.

Sunday, March 14, 2010

Pillow Perfect


I found an amazing deal at my local fabric store this week! All I can say is thank goodness I spend my time shopping while Madison is at school!

These gorgeous fabrics were in the discount bin for $2 each. They are actually discontinued floor samples of designer fabrics! Which means they were pretty much all the exact same size - or exactly the perfect size to make throw pillows with!

We were in need of some new throw pillows and these are perfect!

The map print is by far my favorite!

Saturday, March 6, 2010

Spring Wreath Tutorial


Super, Super EASY my friends!

Question #1: The yarn wrapping didn't take toooo long but it still took a while. At first it was realllllyyy slow going but then I got into a groove and was able to wrap the wreath pretty quickly. I add a few dabs of hot glue on the back in a few spots to keep it secure.

Question#2: Ahhh the pretty little fabric yo-yo flowers. By no means are they my creation and for that matter neither is the wreath. I have seen both of them all over the Interwebs lately and fell in love. You can find a ton of tutorials on the Interwebs on how-to make fabric yo-yos. I browsed through a few and then did my own thing.

Step 1: Find yourself some fabric scraps. I used what I had in my craft cabinet but I like to troll the discount end of the bolt scraps at my local fabric store too.

Step 2: Cut out lots of circles. Use a cup.

Or a bowl. I wouldn't go any smaller than a juice glass though. I traced with a water soluble pen but I cut the circle just inside the line so I don't really worry about any marks on the fabric.

Step 3: Tie off your thread with a knot and make sure you leave a bit of a tail of thread so you have something to grab onto later. Use what I believe is called a running stitch all along the edge of the circle, folding over about a quarter inch as you go.

Step 4: See simple! I told you so! Now pull your needle to gather the center of your yo-yo. At this point I usually grab the tail too to help complete the gathering. I suppose you could do another stitch now to secure but I just knot and trim my thread. Flatten out as necessary.

All done! At this point you can leave your yo-yo as is or add a cute button!

Friday, March 5, 2010

Spring Please!

I woke up to snow AGAIN this morning! I really wouldn't mind it if it was real snow and not this rainy snow we keep getting but I do have to admit that I am ready for Spring.

When Madison was at school this week I browsed the local craft shop and walked out with a foam wreath and some gorgeous lime green yarn. Yes I did have a project in mind!

I have been in LOVE with the yarn covered wreaths lately and I was desperately in need of some bright color at my house. With a fabric yo-yo how to guide and a few fabric scraps I was able to whip up quite a few yo-yos for my wreath too!

What do you think?

I am in love with the bright colors!

I am already planning another wreath for the summer with these gorgeous red, white and blue fabric scraps I have!