Showing posts with label Everyday Crafts. Show all posts

Thursday, July 26, 2012

Summer Craftin'


A few weeks ago I saw this fantastic melted bead bowl on Pinterest. Of course I didn't actually PIN it so now I can't find it BUT it was super cool and I knew Maddie would love to make one. Or two. So we did.


We have had a bin of perler beads sitting in the closet never getting used because they require way too much patience which Madison does not possess so this was a nice way to use them up and still end up with something cool and functional.


All you need to make the bowls are beads, an oven proof bowl and cooking spray. Oh and an oven. Obviously. While your oven is preheating to 350ish spray the your oven proof bowl with cooking spray and dump in a bunch of beads. Easy.


Next give your kid the bowl to roll around and smoosh the beads up the sides of the bowl. The cooking spray serves two purposes- #1 the bowl won't stick (although I really don't think it actually would) and #2 it works as a sort of glue to help the beads stick on the sides of the bowl. Magic. The beads will only melt and drip slightly so where ever you put the beads they will pretty much stay so we went about halfway up our bowls with beads. 


If we had more beads we probably would have tried to make single color or only used two or three color beads for each bowl but we went with a rainbow look instead which makes them the perfect bowl for crayons!


Instead of pulling out our entire crayon collection every afternoon for the baby to throw all over the room kids to color we toss a few crayons in the bowls instead. Perfect!


I am thinking that Maddie and I may be making another bowl for her teacher this fall. Hmmm maybe filled with a few school supplies? Boxes of crayons? Wrapped up in some cellophane? The wheels are turning! hmmmm....
Monday, September 26, 2011

Melty crayon drawings

I saw this activity MONTHS ago but I was extremely hesitant about doing it with Maddie. Hot plate, melty crayons.... umm sounds like a recipe for disaster or worse a trip to the ER. Well I finally caved and surprisingly everything went well!


Armed with a fresh box of crayons {I love back to school sales!} and my trusty panini press Maddie and I attempted to do some melty crayon drawings. 


I set the panini press for as low as it goes but ended up turning it on and off throughout our craft time so that it didn't get too hot.


After giving Maddie a bazillion warnings about NOT TOUCHING the hot parts we set to work.


The original plan was to let Maddie color in some fall themed coloring pages but the crayons left what looks like a grease ring when we used regular paper.


We quickly switched over to cardstock and had fun watching the crayons glide across the paper.


Look! We are having fun!


Maddie loved this craft and I loved that no one got burned!

Tuesday, June 14, 2011

Inspired Art

MOOOOOOOM I'm BORED. 

I hear that way too many times. 
I am feeling the need to banish the word bored from our house.
It's an evil word. 

Surprise, surprise Bored was Madison's word of the day yesterday but I had a reply this time. Well besides the usual "I guess we might as well toss all your toys then if you are sooooo bored". I stumbled upon the cutest and easiest kiddo friendly project on Pinterest a few weeks ago and quickly grabbed the materials from the closet to combat Little Miss Bored. 


Really this couldn't be any easier I grabbed an unused pencil from the craft closet, along with a stamp pad and some small pieces of cardstock. 

 Maddie was set for an hour or so making her own designs.

 I have to admit I enjoyed doing some cool designs too. Its a very calming technique which I have definitely needed lately!

Maddie loved her finished work and cut to size these would make great postcards to send too!

Tuesday, June 7, 2011

Salt Art

We crafted! Can you believe it?! Me either, but I have proof so it really did happen! I stumbled upon a great post on Pinterest for salt art (similar to sand art from the carnival) and knew Maddie would love it! Plus it was practically mess free and super cheap. 


Armed with our handy dandy trays we spread piles of table salt on white paper and proceeded to color it with plain ole chalk. Easy! Then we dumped it in the smallest Mason jar I had on hand. Since salt is cheap and we still have plenty of chalk I am saving some jelly jars that are a bit smaller to fill with salt next time. For complete directions visit flax & twine

 Maddie LOVED this project and it didn't involve all that much from me except supervision of course! Plus she is still at that great age that when I break out the dustpan and broom she willingly cleans the little bit of mess there was. She is looking forward to showing her Nanny how to make one next month when she comes for a visit!

Thursday, March 24, 2011

Stained Glass Butterflies

The Crafty Crow featured some gorgeous butterflies from Twig and Toadstool that I thought would be a perfect craft for Maddie. 

We did end up changing a few things so they worked well for us. We swapped out the watercolors for finger paints. Less color options for Maddie means less likely to see big pieces of nasty brown colored paper!

We used a thicker white construction paper and Maddie had fun swirling colors together on the paper. I tried to emphasize that we needed to make sure there were no clumps of paint on the paper but of course in one ear out the other. So as she finished each picture I took over smoothing out the paint so we had one thin even layer of paint on the paper.

After the paint dried I cut out a few butterfly shapes and then we used a hole punch, scissors and large circle punch to cut windows out in the butterflies.

At first we attempted to just glue pieces of tissue paper into the windows but I guess our white paper was a bit thin because we could see the tissue paper outline through the butterfly. Not cool. Instead Maddie slathered the butterflies with a glue stick and we stuck the whole butterfly to a sheet of tissue paper. I have to admit this was much easier than using small pieces of tissue paper in each window!

I LOVE how the butterflies came out! Just beautiful!


They make a wonderful spring addition to our backdoor!

Friday, November 12, 2010

Sticker Addict

I don't know about you but Maddie LOVES stickers. Frankly saying LOVES is an understatement. She goes through tons of them. She loves to draw pictures around stickers. She sticks stickers to my floor and her forehead. She just LOVES stickers.

The other day she was attempting to make her own stickers with the backing from some already used up stickers but was not happy to find out that the backing was not sticky. 

 The light bulb went off right then I snatched my Sharpies and cool scissors out of the closet to whip Maddie up a set of her own 'Make Your Own Stickers'.

We have had a package of full sheet label paper in the house for ages. I use it occasionally when making labels but for the most part it hangs out on our desk not being used. Every time I do use it though I keep all the scraps which were perfect for this project.

I quickly drew a few squiggly and lined frames on the labels and cut them out with fun scissors.

Maddie was THRILLED at the thought of making her own stickers and set right to work.

An hour later she was done and so proud of her creation!

Older kiddos can definitely do this project all on their own but I was concerned that Maddie would have a hard time reigning in her artwork if I gave her a whole sheet of label paper without frames!

Friday, June 18, 2010

A Piece of Home

The movers come in exactly 24 days, which means I am officially in a total state of stress. Yikes!

We are trying our hardest though to make this move easy on Maddie. It's technically not her first move but it will be the first one she remembers. Of course she has had all the usual questions about the move like "will we bring my bed? And what about the bathtub?". After reassuring her that yes her bed will come with us but she will have a new bathtub in the new house we decided that we should bring a little piece of Connecticut to Virginia with us.

After picking out the perfect rock from the backyard Madison spent a few days this week painting her perfect masterpiece. I took a Sharpie to it when she was done to add our city, state and years we have been here. After a quick coat of glossy Mod Podge we now have a piece of home to bring with us to our new home!

Saturday, June 12, 2010

Paper Towel Art

Maddie had her big dance recital last week and she did wonderfully! Of course we had to get her flowers for her big performance along with every other family member that attended! She ended up with a huge bouquet in her room but we also ended up with a few floral tubes...

hmm... what to do? What to do?

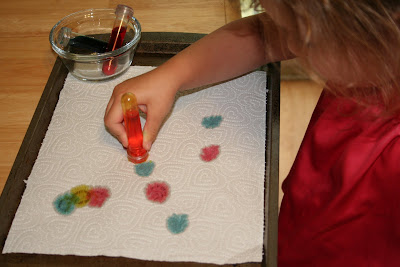
I while back I saw a post about turning floral tubes into paint dotters and thought that would be perfect! If it was on your blog please let me know, I would love to give you credit!

Materials: floral tubes, food coloring, paper towels, cookie sheet/tray

Add a few drops of food coloring to the tubes and fill them up with water.

Time to let the kiddo loose! Madison had a great time dotting away on the paper towels. She loved watching the colors mix together and make cool designs.

I set the paper towels out on cookie racks to dry and we ended up with these great tie dye effects!

We did this project inside but I think it would be fabulous OUTDOOR project...you know so there aren't any food coloring stains on your table...


Wednesday, May 26, 2010

Jellyfish: the kind that don't sting

Madison has been obsessed with jellyfish lately. No clue why. Whatevs.
Of course when I asked if she wanted to do a project she screamed she wanted to make a jellyfish, but one that doesn't sting. Done and done.

Materials: paper lunch sack, newspaper/tissue paper, masking tape, string, hole punch, paint/dotters/markers, crepe paper and glue.

I happened to have a bunch of white lunch sacks so we had no problems painting over these. Before we began I used the hole punch on the side to make some holes to hang our new friend with.

After I tied on the string Madison crumbled up strips of the Sunday newspaper to stuff it with. I used white masking tape to close - that way we can paint right over it!

Madison went to town with her paint dotters.

While the paint dried I glued a few strips of crepe paper together in a little circle and then glued it all to the bottom of the jellyfish.

Add a few eyes and look at that!

Monday, May 24, 2010

Coffee Filter Bunting

Ohh emmm geee!
I love how this project turned out! Super simple yet oh so very cute!

Madison set to work decorating a few coffee filters with water colors while I played Mario Brothers on the Wii did laundry.

After they dried I folded each one in half over a string of twine and glued the halves together with a glue stick.

Sadly I have no mantle to hang it on, yet. I will. But for now it gets to hang above the bar in our kitchen.

I think these would look uber cute made with little paper doilies too!